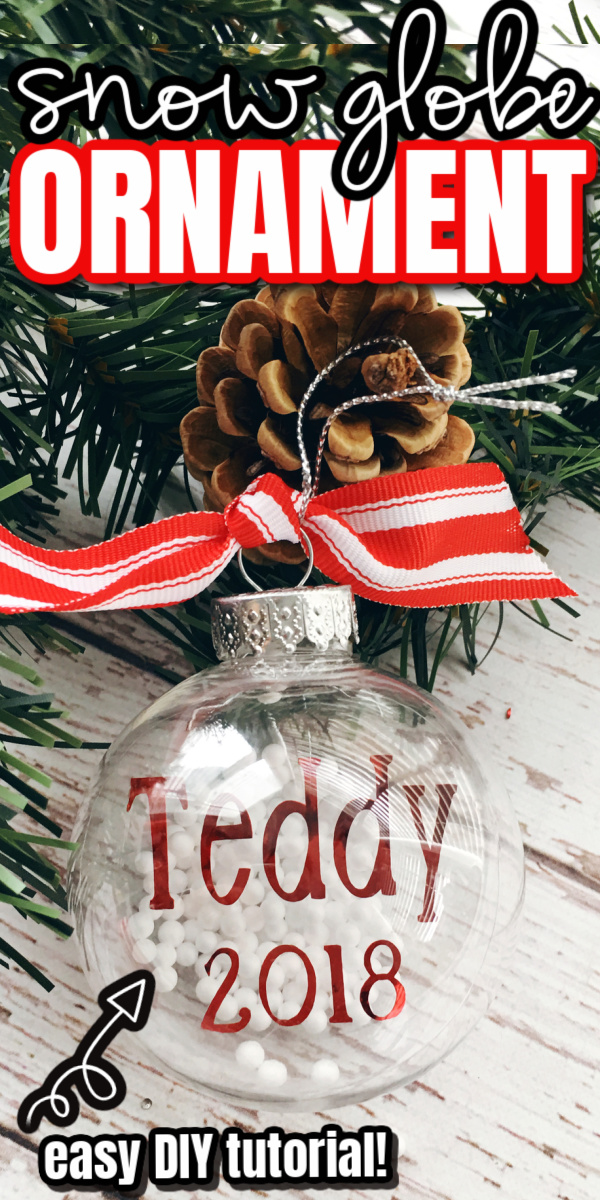
Turn dollar store items into awesome personalized snow ornaments! This DIY Snow Globe Christmas ornament tutorial is perfect for gift giving.
I absolutely love making Christmas ornaments. I love how they combine tradition, memory making, and when you’re taking about DIY ornaments, creativity.
Some Great DIY Christmas Ornaments
I love that ornaments can be given as gifts, collected as travel moments, and passed down and cherished over generations. And there’s just something extra special about homemade ornaments.
- Photo Collage Ornament
- Rudolf Reindeer Ornament
- Melted Snowman Ornament
- Glazed Photo Ornament
- Marble Painted Ornament
- Joy Wood Slice Ornament
- Glitter Stenciled Ornament
- Book Page Ornament
- I Spy Ornament
I love the stories and accompany each ornament and the flash of memory you get as you hang them each year.
A few years back I made these last minute diy snow glove ornaments as gifts for the teachers and staff at my kiddo’s preschool as well as some gift box for friends little ones.
I put them in a cute tin box with some super soft leggings, some fuzzy slippers, and a few other goodies and they were a quick easy gift.
I found most of the supplies at the dollar store and using my Cricut cutting machine I was able to make these fun personalized floating ornaments.
The little foam balls were also a seasonal item I found at the dollar store but I know craft stores carry those as well!
What You Need to Make a Snow Ornament
As with all my crafts I’ll show you what I used but you can totally make it your own and use your stash or whatever strikes your eye.
I’m linking all the supplies with my amazon referral links so you can see what they look like but you can find most of these way cheaper at the dollar store or the local craft store.
- Laminating Plastic Sheets
- Metallic Vinyl
- Transfer Tape
- Plastic Ornament
- Tiny foam balls
- Ribbon
- Cutting Machine
- Personalization (the Let it Snow and Merry and Bright are available on my downloads page to my email subscribers)
- Snow globe ornament template (if you aren’t already an email subscriber sign up for free here or in the widget below)
If you’re not familiar with laminating sheets the are basically plastic folders that you stick your document or whatever in between and then run through a laminating machine. For the purpose of the ornament though you’re actually going to pull the thin sheet off and only use the thicker layer.
Now I used metallic vinyl and absolutely love how it turned out, but you could easily use any sort of sticky vinyl that you want.
I stuck with just the tiny foam balls but you could add glitter, sequins or other fun tiny bits of things to get a totally different look with the same technique.
I am sharing my insert template but since I don’t know if the ornaments you find will be exactly the same size as mine I will share how I made and tested mine.
How to Make a Snow Globe Ornaments
You first need an insert template. I made my insert template by welding a rectangle to a circle in Cricut design space. Then I cut it out of paper and then put it inside my ornament. I adjusted it a few times until it fit how I wanted, filling as much space as possible.
Next cut the design you want to go on it from vinyl. I did a few Let it Snows and Merry and Bright for the gifts I gave but I also made Teddy one with the year on it and I just love how that turned out.
- Size the message/image so that it is a little bit smaller than your insert piece.
- Cut out of vinyl.
- Weed out the negative space so you are left with just the vinyl design and paper backing.
- Apply transfer take to lift the vinyl up exposing the sticky side.
- Transfer to the insert piece making sure that the rectangle is pointing up. This is your handle so to speak.
- Remove the transfer tape.
Next remove the metal part of the ornament and gently roll the insert and slide it into your plastic ornament.
How to get the snow into Using a funnel or piece of paper rolled into a cone pour in a few foam balls. Heads up this is the most time consuming part. Those stinkers are so staticky they are kind of a pain to get in there but trust me it’s worth it.
Replace the metal hanger of the ornament and add a bow or tie of ribbon.
Simple Gifts Perfect for Pairing With Ornaments
I love the idea of gifting an ornament. I think it makes a fine gift on it’s own but also as a compliment to something else.
So many times you feel like giving a gift card but it just feels too impersonal. Well whip up one of these easy DIY gift card holders and pair it with a cute ornament and you’re good to go.
For girl friends, teachers, and female neighbors a simple scarf or 10 minute cowl makes for a nice thoughtful gift that only takes a few minutes.
Want another bundle up gift idea? My fleece bow turban headband makes for a really cute way to keep ears warm during colder months!

DIY Snow Globe Christmas ornament tutorial
Ingredients
- Laminating Plastic Sheets
- Metallic Vinyl
- Transfer Tape
- Plastic Ornament
- Tiny foam balls
- Ribbon
- Cutting Machine
- Personalization my Let it Snow and Merry and Bright are available to my email subscribers along with my insert template
- Snow globe ornament template
Instructions
- You first need an insert template. I made my insert template by welding a rectangle to a circle in Cricut design space. Then I cut it out of paper and then put it inside my ornament. I adjusted it a few times until it fit how I wanted, filling as much space as possible.
- Next cut the design you want to go on it from vinyl. I did a few Let it Snows and Merry and Bright for the gifts I gave but I also made Teddy one with the year on it and I just love how that turned out.
- Size the message/image so that it is a little bit smaller than your insert piece.
- Cut out of vinyl.
- Weed out the negative space so you are left with just the vinyl design and paper backing.
- Apply transfer take to lift the vinyl up exposing the sticky side.
- Transfer to the insert piece making sure that the rectangle is pointing up. This is your handle so to speak.
- Remove the transfer tape.
- Next remove the metal part of the ornament and gently roll the insert and slide it into your plastic ornament.
- How to get the snow into Using a funnel or piece of paper rolled into a cone pour in a few foam balls. Heads up this is the most time consuming part. Those stinkers are so staticky they are kind of a pain to get in there but trust me it's worth it.
- Replace the metal hanger of the ornament and add a bow or tie of ribbon.
Video

a Rafflecopter giveaway
You Also May Like:
Classic thumb print cookie recipe plus TONS of other awesome cookies exchange recipes!
Make a cute Cork Rudolf Ornament!
These caramel chocolate pretzel rods are easy and make for a great treat or gift!
Make this easy spinach artichoke dip recipe next time you have a gathering or just feel like some comfort good. It’s so good.


creativelybeth says
Love how quick and easy these ornaments are, Marissa! Thanks for joining in the Creative Crafts Christmas FUN!
Laura Walters says
This is absolutely darling and perfect for the holiday season! Thanks so much for sharing!