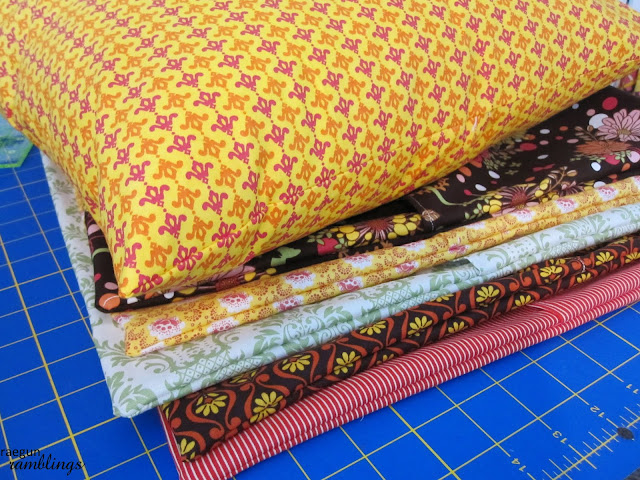
Last week I scored a bunch of pillows 2 for 6$ and I thought it would be fun to have some pretty pillows. These were so easy to make that I made an entire pillow case while talking to my MIL about the father’s day lunch plans (it was only a 10 minute conversation) nice right?
Any ways, ever since I made these six I’ve been envisioning many more pillow cases in my future, you know say for all the holidays, parties, seasons. The next WILL be Harry Potter themed eeek I’m so excited I just need to find a second to make them. Any ways. Here’s how I my tutorial for quick envelop pillow cases. Let me know in the comments if you have any questions.What You Need
- Pillow form (I used a 17″ pillow)
- Fabric (half a yard will do for pillows 18″ and smaller)
What To Do
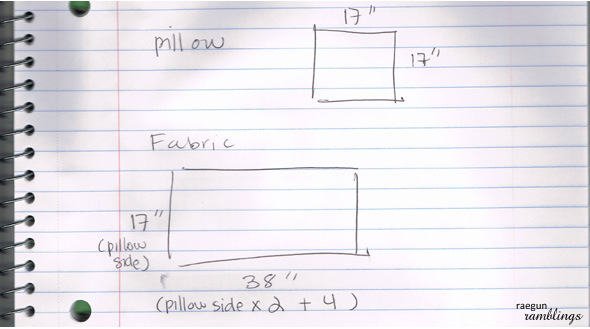
- Cut the fabric. For a 17″ pillow you need a piece of fabric 17X38 inches big. For other sized pillows you need the fabric to be the size of the pillow side (in my case 17″) by the side times 2 plus 4 more inches. So for mine it was 17″ by (17X2)+4
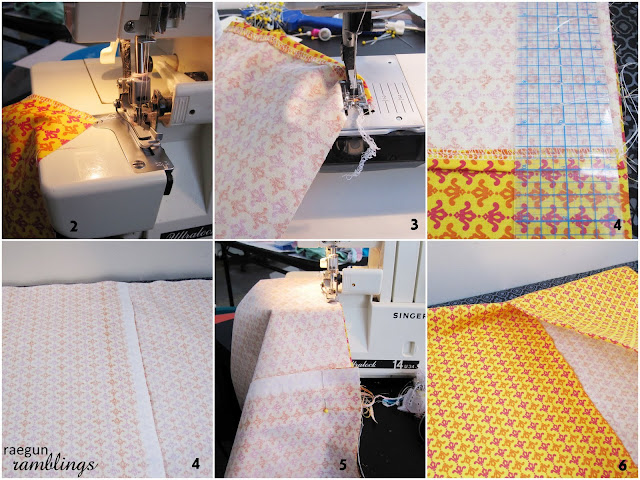
- Finish the short edges of the fabric.
- Fold one side under and hem. This is for the side of the fabric that will show on the outside.
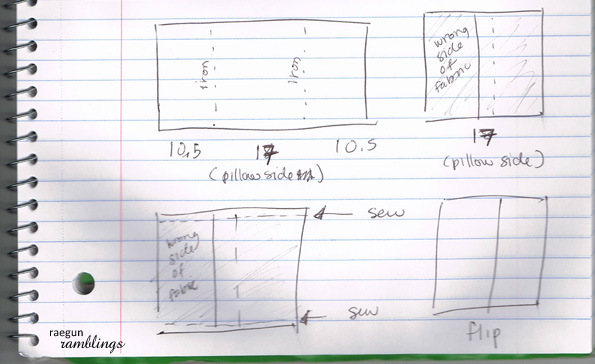
- Fold the fabric in on both ends (right side of the fabric inside) so that there is a square the size of the pillow in the middle. For mine this means that I folded each end in 10.5″. There should be a couple of inches of overlap. Iron or pin in place.
- Sew across the top and bottom.
- Flip inside out and stuff the pillow into the pillow case.
Yup it was that quick. Don’t blame me if you end up making a stack of them, I know I couldn’t stop myself.


Jess@Balancing The Dream says
Great Tutorial!! I am kinda teaching myself how to sew! this project looks pretty easy!! Maybe I’ll test out my skills!! Thanks for sharing!! :)
Anna, www.mylifeandkids.com says
Perfect! I’m definitely going to use this!!
Stopping by from Tatertots and Jello.
Lesley Paige says
I love these and they look just like my sewing “speed”… really easy!
I made some regular pillowcases… check them out on my blog
craftingismytherapy.blogspot.com
Thanks!
Stopped over from TT&J
Jeanna says
What an easy project and great tutorial…
Jeanna @ dramaqueenseams.blgospot.com
Amanda Kuzak says
So impressive! You make it look so easy!
Donna@My Sweet Things says
Oh my goodness! That is really quick! I need to speed it up. lol Great job!
Ami w/AliLilly says
FAB-U-LOUS!!! They looks amazing too! :)
Would LOVE for you to stop by and say hello! :)
http://alililly.blogspot.com
Zannid says
Oh wow, I was just thinking yesterday “I wonder how you make removable pillow cases” and today I stumble upon this blog through the Saturday Weeken Wrap-up! Thanks so much for the tutorial.
New follower from Weekend Wrap-up, would love if you’d stop by my blog sometime!
Suzanna
zannidify.blogspot.com
Terry says
I’m a non-sewer with a sewing machine..pretty dangerous! But I think I can make some of these to cover up by pillows…Love the directions…please stop by and link up to my party going on now!
Bridget from Cali says
Terry: Me too. I inherited a couple of sewing machines from my mom who was an excellent seamstress. Plus a massive amount of sewing notions and fabric. Far more than I can actually keep, so let me know if anyone has ideas about finding a good home for this stuff. I don’t have the heart to let go of the vintage buttons, hooks, wooden spools or yardsticks. One day I hope to tackle a tutorial like this one too!
Delaney says
Lovin’ these fabrics!
http://sweetteaserendipity.blogspot.com
Jenna says
That looks so simple! No fuss whatsoever! Love that!
Michelle says
I love these! I made some like this that were scrabble themed but I love the patterns you have! I am visiting from Tatertots and Jello and I would love if you would link this up this weekend to my Delicately Constructed Fridays linky party!!
Have a great weekend!
Michelle
http://www.delicateconstruction.blogspot.com
Rebecca (Soap Deli News Blog) says
Excellent! Love this tutorial. Thanks so much for sharing! I’m not much of a sewer but I do have a machine I need to learn to use! I mostly make bath and body things and share my recipes and projects on
Soap Deli News Blog.
Michelle {Daydream Believers} says
2 for $6! That is a great deal! :) I really like the fabrics you selected for the covers too! Nice work! :)
Taylor says
Hi I am guest hosting at tatertots and jello’s weekend wrap up party and I featured this today! Come check it out… awesome project!
-Taylor
http://www.taylormadehome.blogspot.com
Thrifty Crafty Girl says
This project looks super easy, what a great tutorial! I’m your newest follower!
Megan says
great tute! bookmarking now…
megan
craftycpa.blogspot.com
K says
This is super awesome! I definitely just made these with some spare fabric lying around and they turned out perfectly and look adorable. Thanks for the excellent project, I’ll be using this again for sure! :D
Jena @ Involving Color says
Great tips! I love the fabrics you used. I’m hoping to try this one day!
Madigan at madiganmade says
Such pretty pillows! Great tutorial. Not sure if I could sew them that quickly. Love the fabric, too.
Stacey says
Marissa –
So pretty and colorful! Thanks for the tutorial! As soon as i figure out the sewing machine, this is what I’ll be doing! I would make a ton, too! You can switch them out whenever! How fun!
Visiting from It’s So Cheri!!
Stacey of Embracing Change
Just Jaime says
Love the fabrics you chose!
LrSchwtz says
This is a great tutorial. I’d love for you to post this on my Share the Wealth Wednesday Link Party at http://www.laughloveandcraft.com. I’m your newest follower!
Mary says
Thanks for the tutorial, my kids want to learn to make pillows this summer. I’ve got the fabric, and now I’ll be using your tutorial!
Bri says
just saw photos of your pillows on craftgawker and wanted to say that I like your fabric choices! I’m a sewer too and I’m hoping to make quite a few more pillow covers before I go off to grad school in the fall :)
Brandy J. says
Love the pillows!! Thanks for the great tutorial.
[email protected] says
Gotta love those sales. All your fabric is gorgeous. Definitely love doing slip covers for pillows. Visiting you from Tip Junkie.
Jenn says
Thanks so much for the great tutorial. This is actually on my To Do list. Pinning!
Whispering Peace says
Oh wow..I’m remodeling my house and I’m envisioning throw pillows to match the living room, the bedrooms and so on…holidays….I can see this become an addictions. It’s so gratifying to sometimes do the faster projects and see results faster than crocheting a blanket or hand making a quilt.
http://gooeyhandsnmomscrafts.blogspot.com/2011/06/craft-review-fancy-beaded-danglers.html
Cedar says
Very creative! So cute! Final Harry Potter movie–should be wonderful!
Christina says
Very cute pillows!
Musings from the girl next door... says
love this! i scored six 18″ pillow forms at Target on clearance for $4 total and have been trying to figure out what to do with them. i’m SO going to do this!
(i’m visiting from the linky party over at All Thingz Related!)
ana.gr says
Love how you explain visually, love the fabrics, the colors, everything!
Susan says
Oh my, these are just perfect.
Love all the fabric you choose!!
Hope your day is blessed!
Buffy says
I’m relaly into it, thanks for this great stuff!
Kelly @ Run With Glitter says
SO very cute and simple!! Love it! Thank you for linking up! I shared this on the GLitter Facebook page..
http://www.facebook.com/pages/Running-With-Glitter/111774958903316
Sallie says
Great tutorial! Thanks.
Misty @Creative Itch says
Love those pillow cases!! Thanks for linking @’Sew Cute Tuesday’!
Ginia says
Absolutely Beautiful!
Thanks for the directions. I will have to remember to add directions to my projects next time.
Thanks for sharing @ tipjunkie.
Virginia
http://www.indubitablyartsy.com
Natassia says
Love this! I am also teaching myself to sew and have been wanting to make pillows! This will be a great help!!
http://natsknapsack.blogspot.com/
Sweet Floweret says
Fabulous!
Love it if you’d share at my 20 minute tuesday link party today!
Tina
http://www.sweetfloweret.com
julie says
ohhh…I love pillows almost as much as I love shoes!! :)
Ginger says
Following from Not Just a Housewife. Love the pillows. Would love to have you link this up to my {wow me} wednesday link party going on right now over on my blog. The most view link will receive a set of fancy rectangle chalkboard labels from my etsy shop. Hope to see you there.
Ginger
gingersnapcrafts.blogspot.com
Erin says
Oh how I wish I could sew. I do everything by hand, even though I own a sewing machine. :(
Either way, I love how your pillow covers turned out! And the fabrics you chose. :)
Rachael says
Lovely fabrics! These look lovely x
http://www.sewrayme.co.uk
Rachel@I Heart Crafty Things says
I love these! Thanks for the tutorial! I pinned this on Pinterest. I’m coming over from Wow me Wednesday Link Party!
Alisha @ Crafty Brooklyn Army Wife says
Love the fabric and pillows!! Thanks for the great tutorial!! Stopping by from Tea Rose Home linky party and your newest follower.
Here is what I shared this week: http://craftybrooklynarmywife.blogspot.com/2011/06/summer-pillows.html
Leslie says
This is making me wish I had a sewing machine!
casserole says
They turned out so pretty!! I linked to your tutorial on Craft Gossip Sewing:
http://sewing.craftgossip.com/tutorial-envelope-style-throw-pillow-cover/2011/06/30/
–Anne
Seaweed and Raine says
Love your fabrics – and you are right – that DOES look super quick! Thanks for the Tute.
Ginger says
Love all the pretty fabs! Thanks for linking up to Mad Skills Monday!
Frenchy says
That’s a subtle way of thkniing about it.
Elizabeth says
Thanks so much for linking up to Made With Love! I’m featuring you on the FB page today! Happy Summer :) http://www.facebook.com/SewChatty
Crystal says
Great tutorial!!! You make it look very easy! :) Thanks so much for linking up to the Summer Lovin Soiree! Have a great weekend! :)
Crystal
HomemakerinHeels.com
Jady says
A wonderful job. Super helpful inontmariof.
June Scott says
This is great, Marissa! I’ve got some fabric I’ve been wanting to make into pillows for awhile now.. off to Joann’s for the pillow forms! Thanks for the tut!
DeeDee @ClassyMommyD says
this is great! i was going to make my own pillow cases but this is way better than having to deal with zippers :) definitely going to do it your way, easy way to change the pillow cases.
{nifty thrifty things} says
Love the fabric and the pillows! Great job!
Thank you so much for linking it up to {nifty thrifty sunday} last week!
Hope to see more of your creativity tonight! :)
xoxo,
Vanessa
To Sew With Love says
congratulations, Marisa, on making it to this week’s featured projects at TSWL! We are sharing your project on our Facebook page. By the way, votation will start today! Grab our new featured button if you fancy so ^^)
Have a lovely weekend!
hugs,
TSWL Ladies
Jami says
Ten minutes for you may equal half an hour for me, but still pretty quick! They look great! Thanks so much for sharing at the Tuesday To Do Party!
Smiles!
Jami
SJ @ Homemaker On A Dime says
Hi, friend! Happy 4th of July! Btw, I’m admiring all your creative posts here. Can you please share them at the Creative Bloggers’ Party & Hop? Hope to see you there at the party :)
Chad and Mary Beth @ Nothing But Country says
Thank you so much for linking your creative project up at Nothing But Country.
We have featured you on our site this week. Thank you sooooo very much.
If you would like to grab a I have been featured button you may :)
Have a wonderful week.
Keep on craftin’
Kindest,
Mary Beth @ Nothing But Country
Shannon says
Fabulous! I LOVE pillows! And speedy pillows are the best – perfect way to liven up a room. Love your fabrics! Thanks for giving us the play by play!
Angela says
So pretty! I love it. I have a little blog party called Simply Creative over at 365days2simplicity.blogspot.com. I’d love it if you linked this project up!!
Angela
Paige says
thanks so much for this tutorial! i am a beginner and this looks like something i might could handle. gonna make some throw pillows for the kids’ beds…maybe applique an initial or something on them!!!
isbelle says
This actually didn’t make much sense to me. I need a video or something. I don’t know what a lot of these sewing terms mean exactly :(
marissa says
isbelle if you have a specific question about a term or step let me know and I’ll try to explain it. If you are brand new to sewing though you may want to have someone show you and walk you through things step by step
[email protected] says
Hey Marissa,
I love ya girl, you are soooo flippin awesome for always supporting my blog, and linking up, I appreciate it so much, so THANK YOU for that!!
These pillows girl, make me happy. I love the fabric, the colors, and the ease. When I ever get around to making throw pillows they will all HAVE to be removable, just like this. I actually USED to make pillows like a decade ago, back in CALI, I even sold a bunch to friends. Wow seems like an eternity ago. Thanks for the reminder of how simple it can be.
Thanks so much for linking up to my party :)
I loved this so much, I featured you girl!
Come grab a button girl, and display it proudly!
Hugs, Bella **Features from week #43 & 44** @ Bella Before and After
**PARTY PLANNING TUESDAYS** @ Euro Style Cakes. Party planning tips, decorations, invitations, and recipes welcome to link up.
Kaylee says
Love this tutorial! I will definitely be making many to bring with me to college next year! They will brighten up my room so nicely ;P and, using up all of my old fabric doesn’t hurt! (Of course, a pleather pillow cover might scare off my roommate… maybe I shouldn’t use that fabric…)
Natalie says
I just made a few of these pillows. SO EASY!!! Thanks a million!
cookingcacophony says
Umm thank you!! I am a new sewer and have been trying to figure out how to put a removable cover on a pillow form I bought. Just made it following your tutorial and it turned out perfectly. Awesome!
Lynette @ My Craft Discovery says
um thank you. I almost followed a different tutorial, but this one is easier because I only have to cut one piece for each pillow! You’re a genius. Thanks!
Stephanie says
I made some these pillows a couple of months ago and even did a tutorial on my blog, but I had no idea they were called envelope pillows! I just called them zipper free! Now I know, thanks!
oh, jenny mae says
8 months later & i’m loving this tute! i have about 15 pillows to make for my girls this week!
c says
Thanks for the tutorial! Just made a couple for my couch and it was so easy!
Beth Penny says
Thank you so much for this EASY tutorial! I made 2 tonight…so much fun! And…easy enough to change every season.
Kim says
Marissa, I am obviously very late to the party on this one, but I just found this project on pinterest and thought that maybe even I could try it. I am a non-sew-er with an inherited old machine, but I had bought fabric a few years ago to cover some pillows in my living room. Problem was that I never had the confidence to actually start the project until I came upon your project. It took me longer than most (mostly trying to figure out how to thread my machine) but I now have two pillow covers and an amazed family. Thank you so much for sharing your creativity!
marissa says
Kim I couldn’t email you back (or find a blog to comment back) since your info is private. But that’s awesome! I’d love to see pictures if you share them. I’ve been thinking of doing a post featuring people who have used my tute that would be fun.
Mrs. Mordecai says
Thank you so much for the tutorial! My pillows turned out just right.
Stephanie says
Thank you for the tutorial! I’ve now made 3 pillows using your instructions. They are so super easy! Here’s the most recent one I made: http://itsmylife-scrappysteph.blogspot.com/2012/05/patriotic-pillow-no-2.html
And the first set I made earlier this year: http://itsmylife-scrappysteph.blogspot.com/2012/02/my-homemade-couch-pillows.html
Thank you for the great instructions! I love being able to take the covers off to put new ones on. My next project is to make an envelope pillow case and then applique a flat with fabric on to the front of it!
Stephanie says
Ok, my comment should say flag, not flat. Sorry.
Amara says
Awesome and easy, just what I needed to update some rooms for summer. Thanks a million for the tutorial!
Unknown says
If you make the height equal to your pillow height, won’t it be too small because you’re not making room for any seam allowance? So shouldn’t you make the fabric 18.5 inches for an 18 inch pillow? Just curious because I’m VERY new to sewing.
marissa says
Unknown that’s what I thought too but I guess you want the pillow to totally fill it up it looks a lot better if it’s the same size than slightly bigger
Heidi says
I just wanted to let you know I’m linking to your tutorial on my blog:D Great pics and info on how to get started on this style of pillow case.
Sarah says
Been trying to decipher this tutorial for half an hour. Totally confused! Not sure these instructions are very thorough, especially for a beginner.
marissa | Rae Gun Ramblings says
Sarah do you have a specific question? If you want to ask I’m happy to help try and help. If you are super new to sewing I know following sewing directions can be very confusing especially if you are a hands on learner. You may want to just cut some paper out and fold things to see if it makes more sense. I’ve had many people find the tute helpful so I’m not sure where to start without more direction. You might just want to have someone that sews walk you through it.
Ameya Home says
This comment has been removed by a blog administrator.
Mogulinteriordesign says
Thanks for this easy tutorial!
http://www.mogulinteriordesigns.com/category/26884574581/1/Embroidered-Cushion-Covers.htm
Pirhana says
Thanks for the great tutorial! I just made my dad a cute Star Trek pillowcase with some Kirk and Spock fabric from the store. Love it! I’m crossposting to Cut Out and Keep! http://old.cutoutandkeep.net/projects/by/123353
Erin says
I’ve made these for a tutorial and they are by far the easiest pillow cases I have made! I also did a wax paper transfer to add some text to the cases. Quick and easy project :) http://www.madeurban.com/news/diy-ink-transfer-w-wax-paper/
Juliann says
This is a fantastic tutorial! I used it to make some pillows for the guest room and a cover for the dog’s bed. They were fun, easy projects that saved money and match my decor better than anything I could have found in a store.
Ula @ Blog of Erised says
These are soooo pretty! I never find pillows that I’d like so making some myself would be the perfect solution. :D
Definitely saving this post!
Sean Belt says
One Of the best instructions for pillow.
Thank You for Posting such tutorials on Pillow
Crystal @ Hello Creative Family says
Marissa I adore all of the pretty fabrics that you selected for your pillows! I saw a quote recently that throw pillows are a women’s version of stuffed animals. I’m a bit obsessed with them. :)
It was great seeing you again at SNAP this year!
I included this project in a roundup of some of my favorite DIY and craft projects from people attending SNAP! I’d love for you to take a peek. You can find it here:
http://hellocreativefamily.com/27-diy-projects-from-creative-snap-bloggers/
Best Wishes,
Crystal
marissa says
You are so sweet thanks so much! And so glad we got to chat a little I wish all of us lived close SNAP feels too short :)
handicrunch says
Very nice pillows…